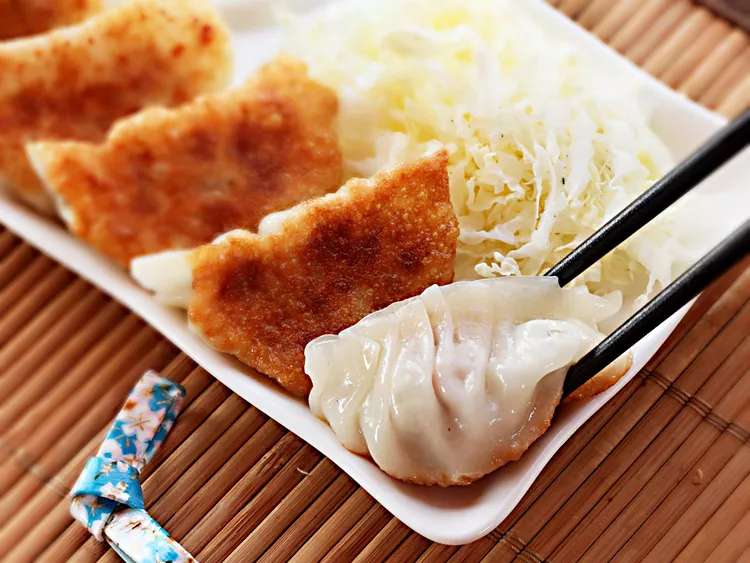
Gyoza (Japanese Pork and Cabbage Dumplings)
Ingredients
For the Dumplings
1 pound finely minced Napa cabbage (about 1/2 a medium head) or regular green cabbage
1/2 teaspoon kosher salt for cabbage
1 pound ground pork shoulder
1/2 teaspoon kosher salt for ground pork
1/4 teaspoon pepper
1 tablespoon minced fresh garlic (about 3 medium cloves)
2 ounces minced scallions (about 3 whole scallions)
2 teaspoons sugar
1 to 1.5 package dumpling wrappers (40 to 50 wrappers)
1 teaspoon minced fresh ginger (optional)
oil for cooking
2 pound finely minced Napa cabbage (about 1 medium head) or regular green cabbage
1 teaspoon kosher salt for cabbage
2 pound ground pork shoulder
1 teaspoon kosher salt for ground pork
1/2 teaspoon pepper
2 tablespoon minced fresh garlic (about 6 medium cloves)
4 ounces minced scallions (about 6 whole scallions)
4 teaspoons sugar
3 package dumpling wrappers (40 to 50 wrappers)
2 teaspoon minced fresh ginger (optional)
oil for cooking
For the Sauce
1/2 cup rice vinegar
1/4 cup soy sauce
2 tablespoons chili oil (optional)
Dumplings
Prepare Dumplings
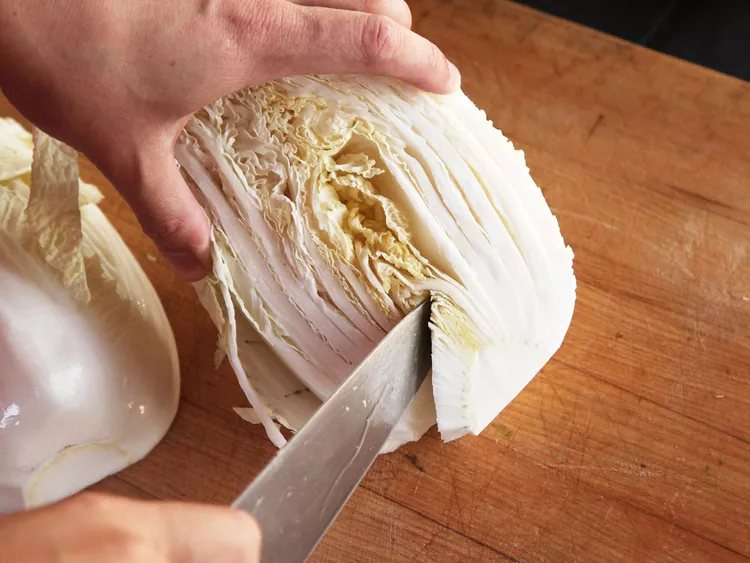
Cut out the Core of the Cabbage
Start by splitting a head of cabbage in half and cutting out the core. I played with various ratios of cabbage to pork and found that most recipes don’t use quite enough cabbage. I use a full pound of cabbage for every pound of pork. This makes enough filling for 40 to 50 plump dumplings.
Mince the Cabbage
Finely mince it by rocking a sharp chef’s knife over it or pulsing it in a food processor fitted with a standard blade.

Salt and Wait
Here comes the moisture removal step: Salt the cabbage with kosher salt and let it rest for about 15 minutes in a strainer over a bowl. The power of osmosis will draw liquid out from inside the cabbage cell walls.
Squeeze that cabbage
Transfer cabbage to the center of a clean dish towel and gather up the edges. Twist the towel to squeeze the cabbage, wringing out as much excess moisture as possible. Discard liquid.

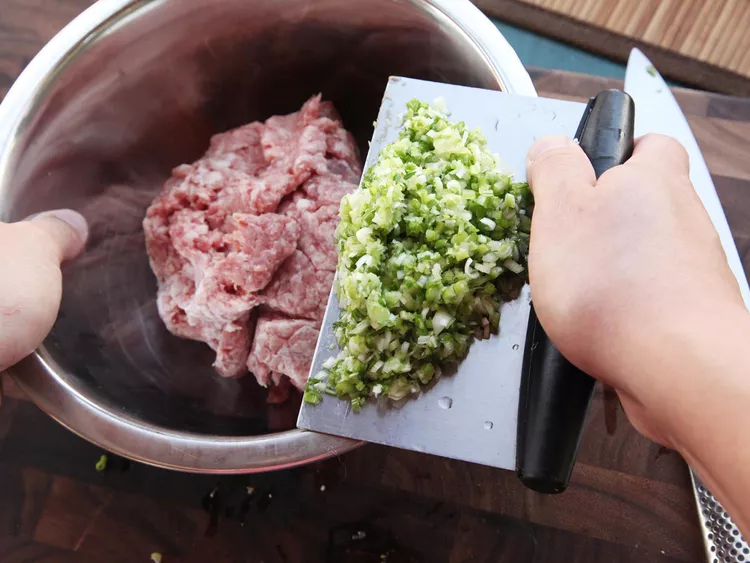
Combine and Knead
Combine pork, drained cabbage, kosher salt, pepper, garlic, ginger, scallions, and sugar in a large bowl and knead and turn with clean hands until mixture is homogenous and starts to feel tacky/sticky.
Adjust the Seasoning
Transfer a teaspoon-sized amount to a microwave-safe plate and microwave on high power until cooked through, about 10 seconds. Taste and adjust seasoning with more salt, white pepper, and/or sugar if desired.
Setting up Your Station to Fill Gyoza
cutting board, preferably wood (the skins will not stick to wood as easily).
stack of pre-made round dumpling skins, kept under plastic wrap to stay moist. If you’re using frozen wrappers, make sure they are fully thawed.
bowl of filling with a spoon or small offset metal spatula for spreading it.
small bowl of water for moistening the edges of the dumpling wrapper.
clean dish towel for wiping fingers and cutting board to keep them dry between dumplings.
rimmed baking sheet lined with parchment paper for the finished gyoza.
How to Form Traditional Pleated Gyoza
To form dumplings, hold one wrapper on top of a flat hand. Using a spoon, place spread a teaspoon to 1 tablespoon-sized amount of filling in the center of the wrapper, in the shape of a disk.
Tip
Don’t make a ball. It will squish out the sides when folding the dumpling.
Use the tip of the finger on your other hand to gently moisten the edge of the wrapper with water (do not use too much water).
Wipe fingertip dry on kitchen towel.
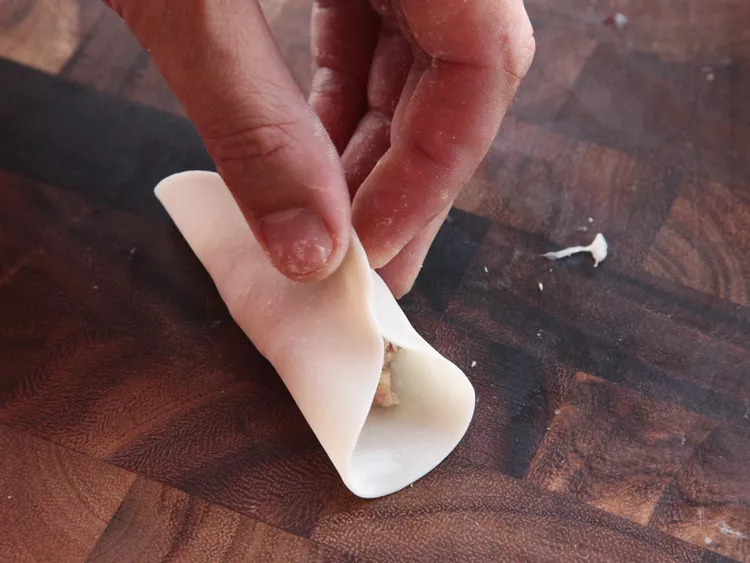
- Simplified method
- Seal the Center
Start by place the filling on the skin and moistening the edge. Lift the front and back edges like a taco and seal them in the center.
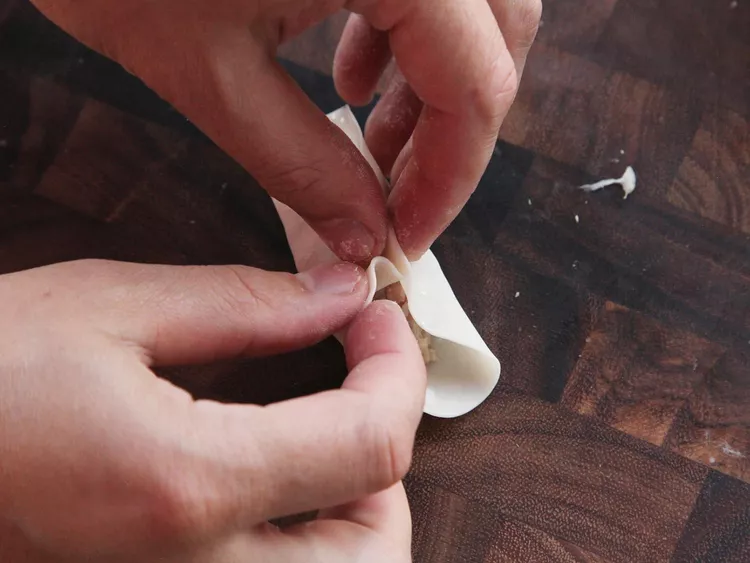
Fold Pleats From Center to Right Corner
Keeping the center pinched, form pleats along the front edge, folding pleats so they point towards the center, sealing the skin as you go, working from the center to the right corner.
Pleat to the Edges
Continue adding pleats until you get to the corner, then seal the dumpling shut, making sure you squeeze out any air as you go.
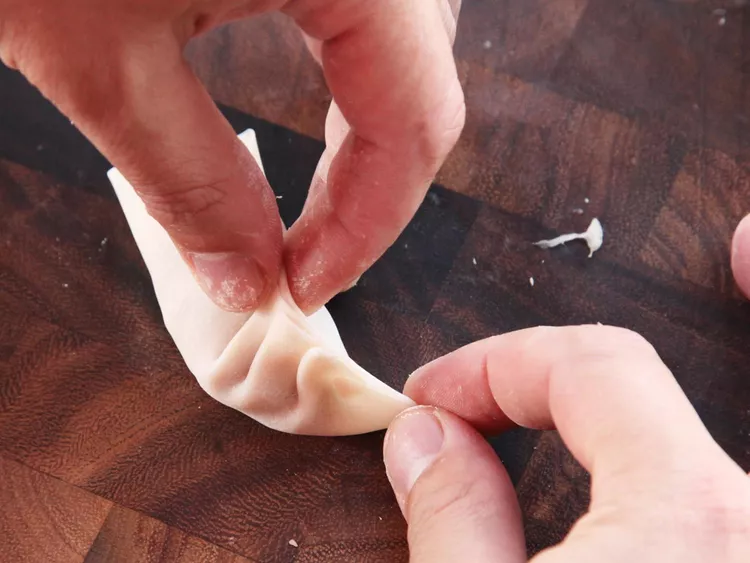
Pleat the Second Half
Repeat the pleating process on the left edge, with the pleats again pointing towards the center, until the dumpling is completely sealed.

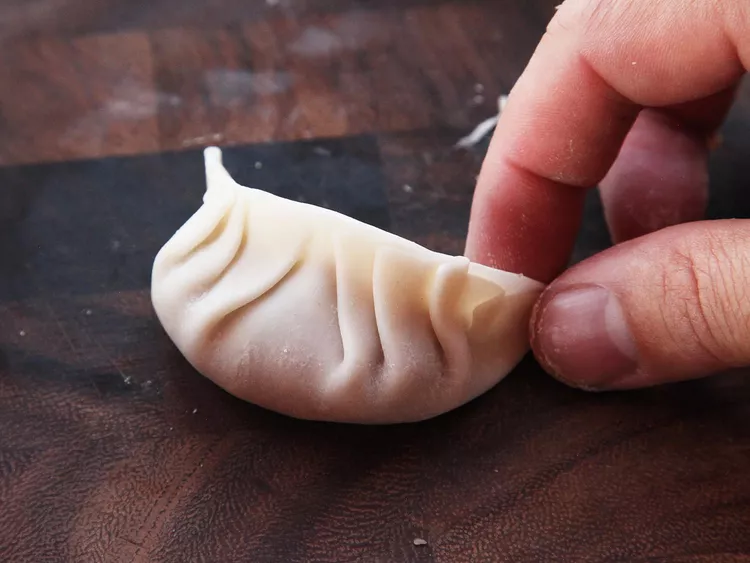
Shape the Dumpling
Plump up the dumpling, flattening the bottom and forming a nice crescent. Transfer the dumpling to the parchment sheet and repeat.
- Automated method
Seal the dumpling
Moistening the edges all around.
Place the filling on the skin in the shape of a disk.
Pressed the edges together. Try to squeeze out any air bubbles.
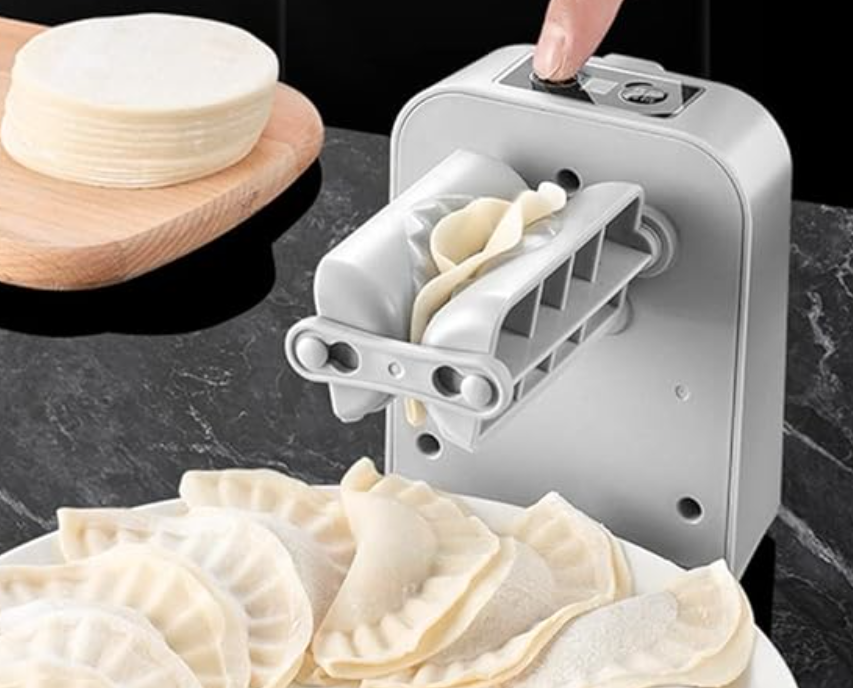
Dumpling Maker
Place the dumpling into the dumpling maker and press the button. That’s it!
How to Freeze Gyoza
To freeze, place the entire tray of dumplings in the freezer uncovered until fully frozen, about half an hour.
Transfer the frozen dumplings to a zipper-lock freezer bag, squeezing out as much air as possible while sealing, and store the dumplings for up to two months. The dumplings can be cooked without thawing.
Cooking
Fry
Arranging gyoza in a non-stick skillet.
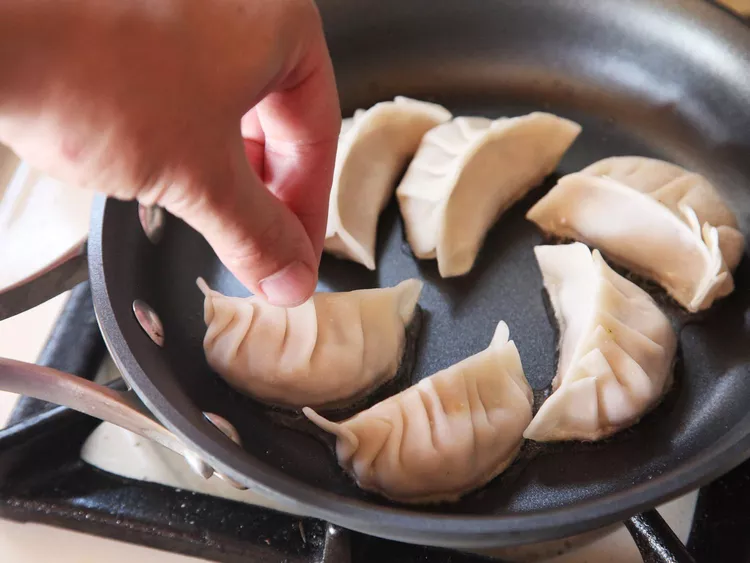
Fry the raw gyoza over moderate heat in oil with their flat side down in a cast iron or non-stick skillet, swirling the pan as they cook so that they crisp up evenly.
Keep frying (and don’t stop swirling!) until golden brown and blistered evenly across the bottom surface.
Add Water
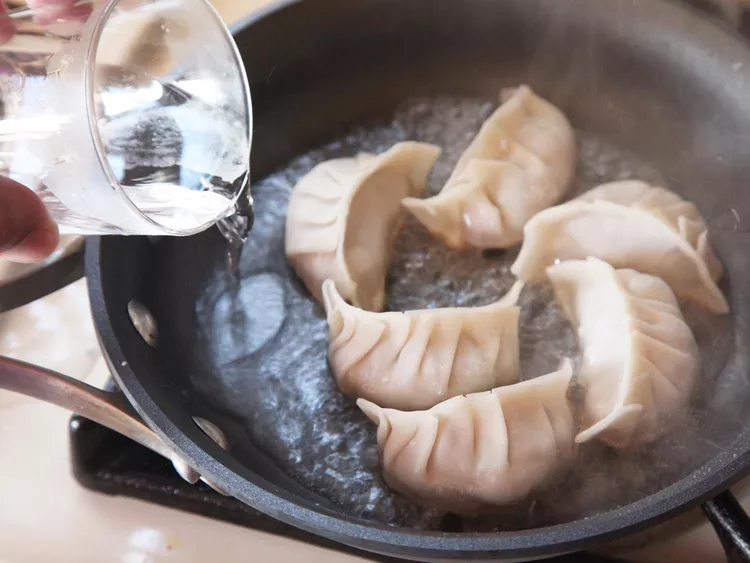
Add about a half cup of water to the skillet all at once; adding it rapidly will minimize the amount of spattering and keep things neater.
Cover and Cook
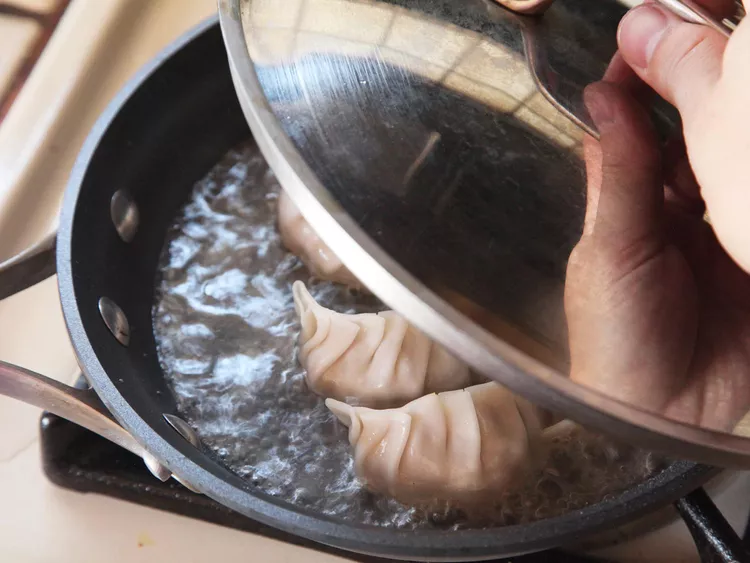
Cover the pan immediately. As the water evaporates, it’ll gently steam the tops of the dumplings, cooking the filling through and steaming the wrapper to a perfect tender-stretchy texture over the course of a few minutes.
Continue to swirl the pan gently as the dumplings steam to promote even cooking and to ensure that the dumplings don’t stick to the bottom too firmly.
Re-Fry Until Extra-Crisp!
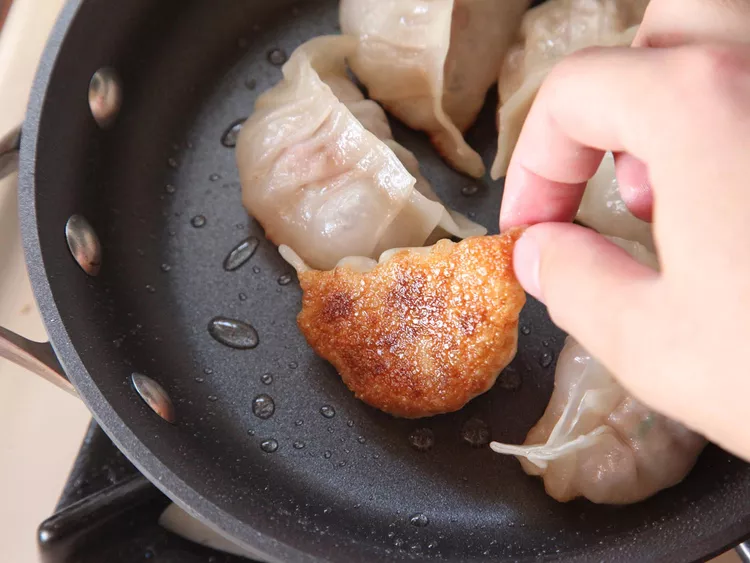
Remove the lid and keep cooking until the water has completely evaporated. You’ll find that as the liquid reduces, the oil will have a tendency to spit and sputter. Again, the answer is swirling the pan. This will limit spattering, promote even browning, and keep the dumplings from sticking.
Keep on cooking until the dumplings are once again crisp on the bottom.
Sauce
Combine vinegar, soy sauce, and chili oil.
Serve.